
Learning how to plant sod in College Station, TX comes down to four things: the right grass, the right season, solid soil prep, and consistent water. Skip any one of those and you risk loose seams, yellowing strips, or a lawn that never fully roots. This guide walks through the exact sequence our crews use on Brazos Valley yards, from choosing a grass variety to the first mow.
Choose the Right Grass Before You Order Sod
Grass choice decides almost everything else about this project: how much sun the spot needs, how often you'll mow, and how fast the lawn bounces back from a dry August. College Station sits in a warm-season turf zone, so your real options are Bermuda, St. Augustine, and Zoysia.
| Grass Type | Sun Needs | Traffic Tolerance | Ideal Soil pH | Best Install Window |
|---|---|---|---|---|
| Bermuda | Full sun | High | 6.0–7.0 | Spring |
| St. Augustine | Sun to part shade | Moderate | 6.0–7.5 | Early fall |
| Zoysia | Sun to light shade | Moderate to high | 6.0–7.0 | Spring or fall |
Most warm-season turfgrasses share a similar target range: most turfgrasses prefer a soil pH near neutral, in the range of 6.0 to 7.0 . St. Augustine tolerates slightly more alkaline soil, with a pH within the range of pH 6 to 7.5 considered ideal. A simple soil test before you order sod tells you whether your yard needs lime or sulfur to get into range, which saves you from guessing after the grass is already down.
If you're weighing sod against seed for a new lawn, our grass seed calculator for College Station breaks down coverage rates and costs for that route too.
How Much Sod Do You Need?
Sketch your lawn into simple rectangles or circles, measure the length and width of each section in feet, then multiply and add the totals together. Standard sod rolls run roughly two feet by one and a half feet, and one pallet typically covers about 450 square feet, since a pallet contains about 450 square feet of sod.
Here's the math in action. Say your College Station front yard is close to 2,000 square feet:
- 2,000 ÷ 450 = about 4.4 pallets
- Round up to 5 pallets to cover trim loss and odd-shaped beds around trees or walkways
- Add another 5–10% buffer if your yard has a lot of curves, since cutting sod to fit always wastes some material
If you'd rather skip the spreadsheet, our landscape design and installation team can measure your square footage and order the right amount before the sod ever leaves the farm.
When Is the Best Time to Plant Sod in College Station, TX?
The best time to plant sod here is during the cooler shoulder seasons: early spring (March through April) or early fall (late September through October). Mild temperatures let roots establish before summer heat or a winter cold snap stresses the grass.
You can track current seasonal conditions for this area through the National Weather Service's College Station climate normals, which cover the Easterwood Airport station.
Bermuda tends to root fastest once soil temperatures are already climbing in spring. St. Augustine and Zoysia often transition more smoothly in early fall, when the soil is still warm but air temperatures have eased. Spring planting means faster green-up but more weed pressure. Fall planting means slower visible growth but less heat stress on new roots.
Sod can technically go down year-round here if you're prepared to water diligently, but shoulder-season planting gives you the widest margin for error.
Step-by-Step Sod Installation Process
Once timing is settled, the installation itself follows a consistent order: clear the old grass, prep and grade the soil, lay the sod, roll it, then water immediately. In our crews' experience across Brazos County's black clay soils, skipping the grading step is the single most common reason new sod struggles in its first month.
1. Clear and Till the Soil
Remove existing grass and weeds, then till the ground to loosen compacted clay. Rake it smooth and pull out rocks or debris. This is also the point to work in a light starter fertilizer if your soil test called for one.
2. Grade for Drainage
Grading has to happen before a single roll of sod touches the ground. If the yard's grade is off, water collects in low spots no matter how well the grass is laid, and sod placed over a drainage problem yellows, thins out, or rots at the roots within weeks.
Walk the yard after a rain if you can, note where water pools, and fill or regrade those spots first. If your lot has a persistent low spot or runoff toward the foundation, a site preparation or grading service is worth the call before sod goes down, not after.
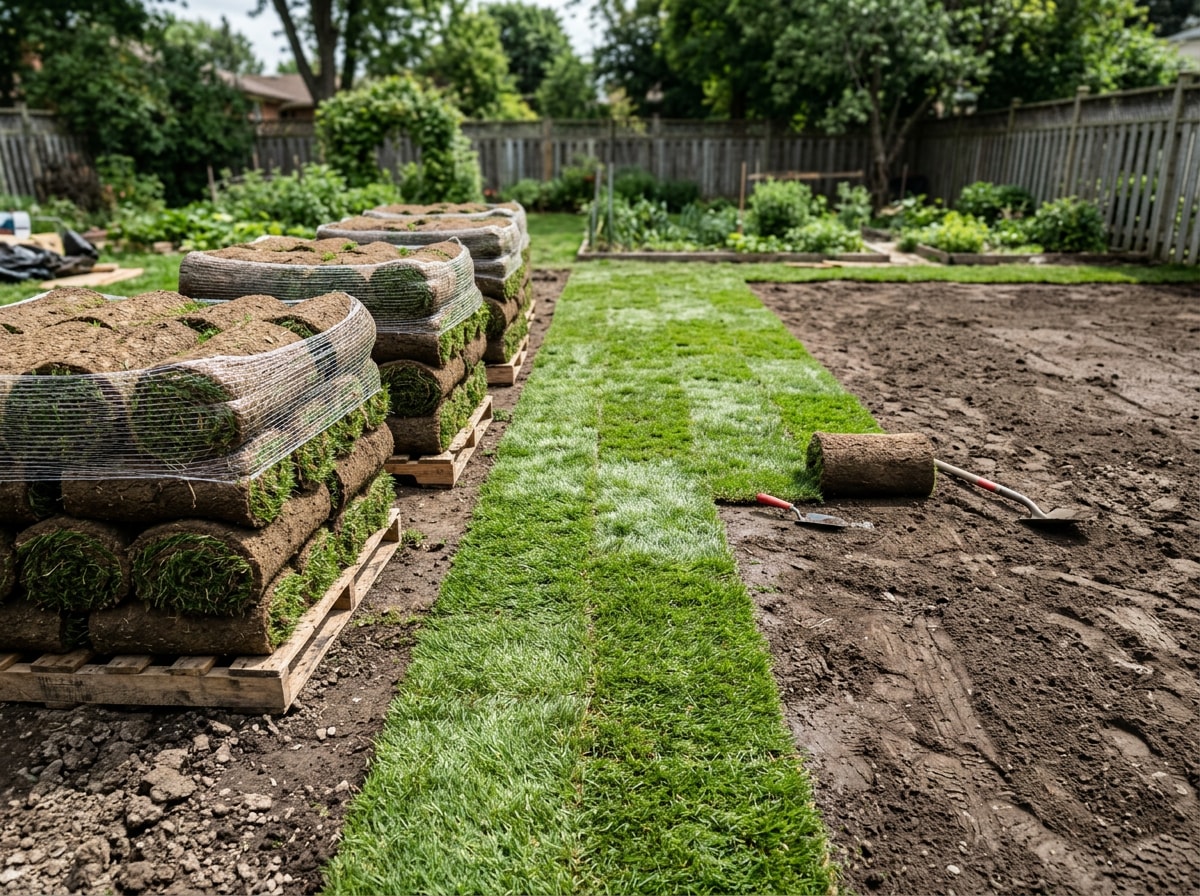
3. Lay Sod in a Staggered Pattern
Lay the first row along a straight edge, like a driveway or sidewalk, then stagger each following row in a brick-like pattern so no four corners meet at one point. This keeps seams tight and spreads root contact evenly across the soil. Industry guidance backs this up directly: lay the first line of sod along a straight line, then stagger the sod pieces in the adjacent rows in "brickwork" fashion .
Push each piece snugly against its neighbor without overlapping, since sod pieces may shrink if allowed to dry out before rooting . Use a sharp knife to trim rather than force odd angles into curved beds or around trees.
Fresh-cut sod does not wait well. Sod is perishable and performs best when installed within 36 hours of harvest , which is why it pays to have your soil fully prepped before the pallets arrive.
4. Roll and Water Immediately
After the sod is down, roll it with a heavy hand roller to reduce air pockets and ensure uniform soil contact . Then water right away: water the sod thoroughly until the soil is wet to a depth of 4 inches, and check beneath several pieces to confirm it's actually wet . Skipping this step is how good-looking sod dies in its first 48 hours.
If you'd rather have a crew handle grading, fitting, and the first watering cycle, get a free estimate from Landscaping BCS before you schedule delivery.
Caring for New Sod
New sod needs a careful first few weeks before it can handle normal yard life.
- Stay off it for at least two weeks. Foot traffic, pets, and play can tear roots loose before they bond to the soil underneath.
- Water for about 30 minutes a day, split into two 15-minute sessions to limit runoff on sloped or clay-heavy yards.
- Hold off on mowing for about three weeks. When you do start, keep the deck high and never remove more than one-third of the blade length in a single cut.
- Wait roughly six weeks before fertilizing, once the root system has had time to establish.

Once the lawn is established, switch from daily watering to a smarter, as-needed schedule. The EPA's WaterSense program recommends matching irrigation timing to what the landscape actually needs rather than running a fixed clock, since clock-based irrigation controllers set a schedule that turns your system on and off, but weather-based controllers can help reduce water waste by adjusting the schedule to local conditions . If you don't already have a controller that can do this, our irrigation installation service can set one up alongside your new lawn.
Beyond the first six weeks, regular mowing, fertilizing, and seasonal cleanup keep sod looking like it did the day it was installed. If you'd rather hand that off, our landscape maintenance team can take it from here.
FAQ
How long does it take for sod to establish?
Most sod takes about two to three weeks to root into the soil below. Consistent moisture during this window is what allows the roots to bond properly, so missed watering days slow the whole process down.
How often should new sod be watered?
Water daily for the first couple of weeks, then scale back to every other day as roots take hold. Once established, most lawns only need watering about twice a week.
Can sod be installed on a slope?
Yes, but sloped areas need extra care. Secure sod with landscape staples to stop it from sliding, and water gently in shorter bursts so moisture soaks in instead of running off.
How soon can you mow new sod?
Give new sod at least 14 to 21 days before the first mow. That lines up with the three-week guidance above, so either timeframe is a safe target.
Is it cheaper to seed or sod a lawn in College Station?
Seed costs less upfront but takes months to fill in and needs more weed control while it's thin. Sod costs more per square foot but gives you a usable lawn the same day it's installed. If you want to compare the numbers for your yard, see our grass seed calculator for College Station.
Can I plant sod myself, or should I hire a professional?
DIY works fine for small, flat yards if you can commit to watering on schedule. Larger lots, drainage problems, or heavy clay soil are where a crew earns its keep, since grading mistakes are expensive to fix after the fact. Contact Landscaping BCS for a free estimate either way.
Whether you DIY this project or bring in a crew, the sequence above is what separates sod that roots cleanly from sod that needs replacing by August. Visit Landscaping BCS to see completed lawn and landscape projects around College Station, or reach out directly to get your yard measured and quoted.
This guide was written by Marcus Whitfield, lead field supervisor at Landscaping BCS, who has overseen residential sod installations throughout Bryan, College Station, and the surrounding Brazos Valley since 2013. Questions about your project? Contact our team.